A traditional Estonian Christmas dinner includes roast potatoes, creamed sauerkraut, cold beet and potato salad, roast pork, and thick cut bacon. But the centerpiece, while intimidating to newcomers, is undoubtedly the star of the meal. It’s a dark, savory barley and blood sausage known as verivorst—my favorite thing to eat in the month of December.
My family visited San Francisco for Christmas last year and Steph and I wanted to cook a traditional dinner. Blood sausage isn’t exactly the kind of thing you can just pick up at Safeway so I thought about making my own. There are groups of East Coast Estonians who get together to make verivorst for the holidays, but it seems like few younger folk are interested in learning how. I had helped make it in the past, although I had never gone through the process end-to-end.
If you’ve never tried blood sausage, you may be imagining a kind of gross congealed sausage, possibly with a coppery or metallic taste. In truth, the consistency is much more crumbly and soft. The taste is more like an earthy meatloaf—much more identifiable as marjoram and barley than as blood.
I really like the idea of using a less desirable portion of the pig. I know that modern meat processing wastes very little of an animal, but back in rural Estonia you would have to process everything yourself, so uses had to be found for an animal’s blood. Much of Estonian cooking embraces such a practical and utilitarian philosophy. It’s possible to make most Estonian recipes using fairly inexpensive ingredients, even if blood isn’t as common in downtown SF.
I know this isn’t the kind of thing that people are just going to run out and make, but I do hope that this maybe inspires someone in the future. It’s not really as difficult as it looks, but the payoff is the continuation of an old cultural tradition as well as a badass winter meal to enjoy with your family.
Ingredients
I’ll be honest that I don’t have a family recipe for verivorst, and the folks who make them back in NJ are a bit more tight lipped about their secrets. So I based my ingredients off of an internet blood sausage recipe I found by a chef who appears to be married to an Estonian but is not Estonian himself. I sanity checked the ingredients with some Estonian cooks and they said it seemed about right.
| Quantity | Ingredient |
|---|---|
| 1.5 lbs | Pearl barley |
| 1 lb | Salt pork |
| 1/2 lb | Pork shoulder |
| 2 c | Chopped onions |
| 1 Tb | Kosher salt |
| 2 Tb | Dried marjoram |
| 1 qt | Pig's blood |
| 12 | Hog casings, 18" |
There are a few differences from the linked recipe. First is that I wound up using pork shoulder instead of belly. This was just a convenience thing, as I just couldn’t find a belly in time. But the shoulder worked out quite well, so it may not be necessary to use belly.
The salt pork I used was just a very generic packaged Hormel salt pork. It was very salty and fatty so I think that more than made up for my lack of pork belly. I’ll look for an alternative next time around, since it felt weird to use such a processed product, but honestly this did work out pretty well.
Pearl barley should be easy to find, especially if you go to a market which stocks a bunch of different grains and flours.
I thought hog casings might be tough to find but they’re available on Amazon. Prime, even. I just threw them in the fridge once they arrived and they apparently keep for a long time.
The blood is unsurprisingly the toughest ingredient to source. The recipe mentions pig blood being illegal to sell, and I saw the same claim in a Michael Ruhlman book on sausage making. None of the butchers I called said this though, so maybe the rules have changed recently or were never applicable in California. Should you find difficulty, I’m told beef blood works as well.
Most of the butchers I called said that they can’t sell enough pork blood to warrant keeping it in stock. I tried placing an order but many won’t even bother for a quantity as low as a quart. It’s just not worth their time. I did get a lot of suggestions to check out Chinatown butchers, as blood gets used in Chinese cooking more often.
Chinatown is a bit out of my way, so I was really happy when 4505 meats said that they had most of a frozen gallon available in their commissary kitchen—right on my way home from work. A gallon was way too much but I was happy to get it. I figured I would use scale up the recipe accordingly and then use the extra to introduce my friends to the magical world of boudin noir.
The folks at 4505 were super friendly and genuinely interested in what I was using the blood to make, so they’re getting all my custom-order meat business from now on (unfortunately for them it’s a pretty low volume). I elected not to take the blood on the muni home, so the walk back was a bit surreal:
So this is how I'm walking home twitter.com/kurrik/status/…
— Arne Roomann-Kurrik (@kurrik) December 21, 2012
Everything else from the onions to the marjoram are very standard. The spice mixture is very basic. Fergus Henderson has a blood cake recipe where he adds many more spices to his mixture, such as mace and allspice. Since making this I’ve talked to a couple more people and mace does seem to be used more commonly, so I’ll be a bit more experimental with seasoning next time around.
Prep
Just a word of warning, the process does get a bit graphic from here.
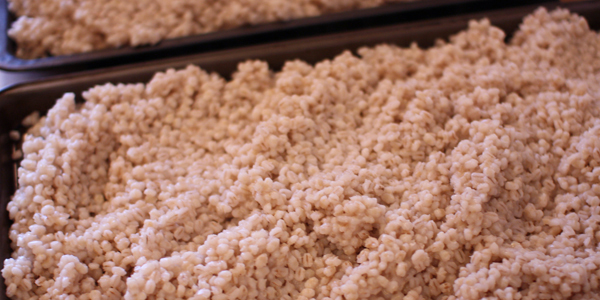
The first thing you should get going is the barley as it takes a while to get enough water boiling and for the barley to cook. Just follow the package directions. Since I had scaled up the recipe I wound up using two giant pots filled with boiling water. When finished, I cooled the barley in several baking trays scattered around the kitchen:
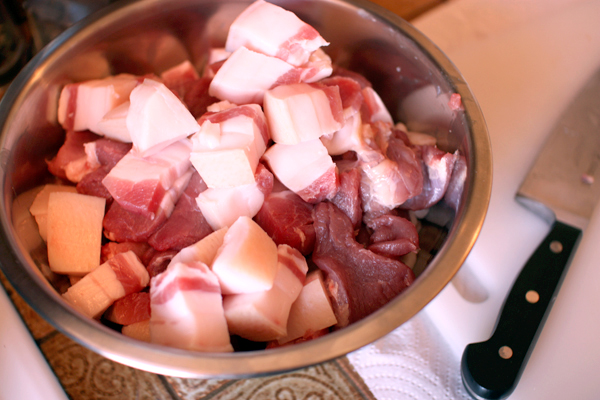
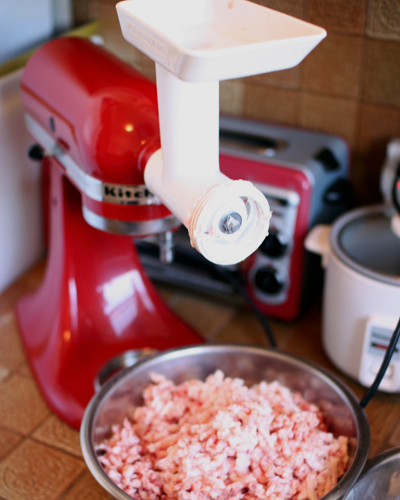
While the barley is cooking, prep the meat. The biggest piece of hardware you need for the recipe is a meat grinder. I have the attachment for my Kitchenaid, although you can get them standalone as well. I find that a powered grinder really pays off, as you get really tired and the meat can heat up too much if you wind up using a hand crank.
Your goal in grinding is to evenly integrate the fat (salt pork) with the leaner shoulder. Start by cubing all of the meat so that the cubes will fit into the grinder and mix them together:
Then grind into a bowl set inside of another bowl partially filled with ice water. You don’t want the fat to heat up too much from the grinding process so that it starts getting soft and mushy.
Sometime around now you should start hydrating the sausage casings. They come packed in salt, so pull out about as much as you need and rinse them off. The casings are incredibly salty and rather gamy, so they’ll need to sit in water for a while and you’ll need to change out the water every few minutes. Make sure to use cold water too—one time when making sausage I used boiling water which cooked the casings and ruined them.

After the casings are soaking, cook the ground meat along with the onions. I followed the advice to cook the meat in a pan until the fat was rendered and a smaller amount of steam was coming off, then added onion:
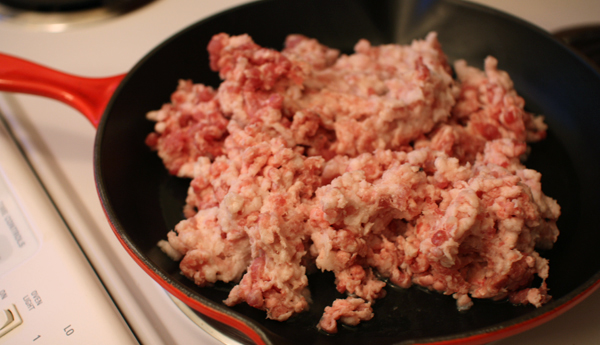
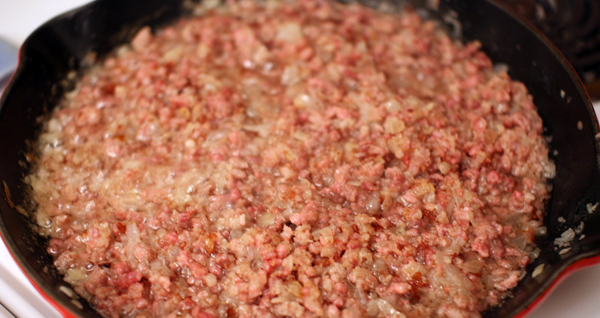
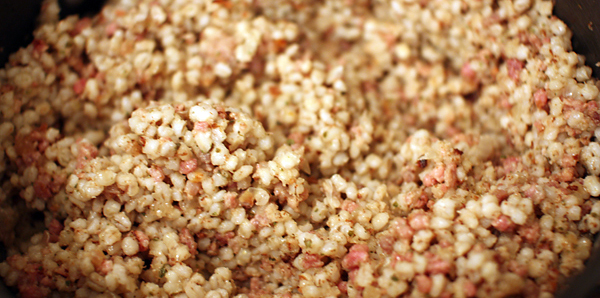
After about 30 minutes total, the meat should be cooked and the onion soft. Move the cooled barley to a pot and dump all of the sauteed meat and onions on top (make sure to include the rendered fat!). Add the spices and mix to integrate evenly.
This is what the barley, onion, spice, and meat mixture should look like:
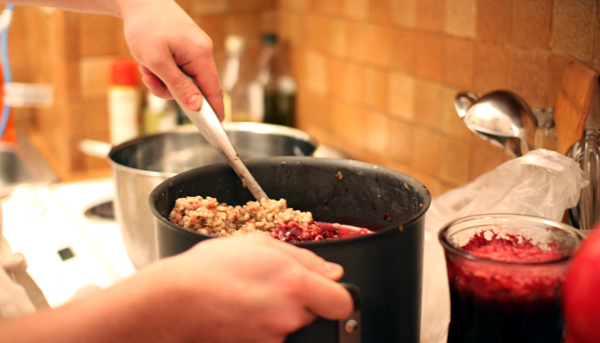
Make sure that the whole mixture is fairly cool (you don’t want to cook the blood with any residual heat) and mix in the pig’s blood. You’ll notice that the blood is sitting in a glass vase in the picture—the whole gallon took a long time to thaw, so I wound up pouring it out and mixing it with a spoon to break up ice chunks. The vase was the only free container in my kitchen large enough at this point.
Now you have the mixture which will be stuffed into the casings. This is the last chance to adjust for flavor. What I did was fry up a small portion of the sausage in oil and taste to see if it needed more salt or spices. I’ve also heard of wrapping a bit in plastic wrap and poaching it, which I think will give a better indication of the final product. I’ve even heard of cooks tasting the mixture directly at this point, which is far out of my comfort zone.

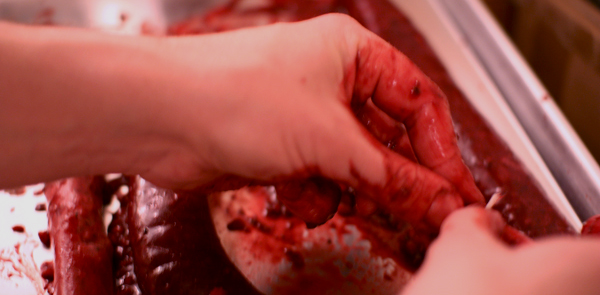
Up until now, the process has been pretty benign, but stuffing is really where you get your hands dirty. I’ve never seen anyone work this out perfectly, so if it seems like things aren’t going that well just be patient and pay attention to the product and you’ll get through it.
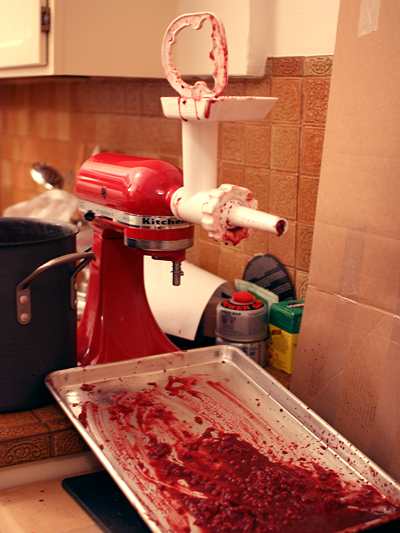
I used the sausage stuffer attachment to my Kitchenaid. Honestly, I think it’s a bit much for such a liquid sausage mixture, as the screw doesn’t really push the material through to the nozzle. There’s a plastic piece which goes in place of the grinding disc which wound up blocking solids and backing up the chute so I wound up taking that out and having a better time.
Next time, I may just go with a funnel and maybe one of those arms which hold beakers over bunsen burners to keep the funnel in place. I think gravity would be a better way of getting the mixture into a casing to be honest.
You’ll notice a tray below the stuffer and a piece of cardboard against the wall. I was smart enough to get the tray in place before we began, but there was a moment where one of the sausages broke and started spraying sheets of blood against the wall of our kitchen. After cleaning up we got the cardboard in place which helped the next time that happened. Something to think about when setting up your workspace, I guess.
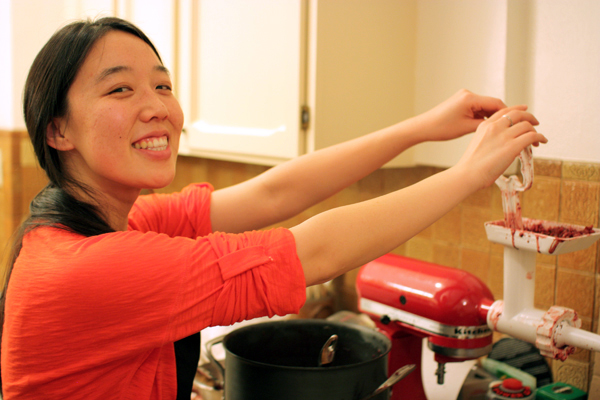
I’ll also point out that stuffing is really a two person job. One person feeds the stuffer by spooning mixture into the top, while the other guides it into the casings and tries to make sure that the mixture is evenly distributed. It’s really important that the stuffer keep stirring the mixture to keep it even. The person handling the casings must not overstuff the sausages and also needs to pay attention to consistency. Because the Kitchenaid wasn’t stuffing evenly, we’d get a trickle of blood for a while then a huge glob of barley all at once. Some light massaging of the sausage was required to even things out.
Luckily, Steph was really good at keeping things moving. She was kind of scary good at it, actually.
Have several 3” lengths of cut kitchen twine to tie off the ends. It takes a bit of technique to keep the filling from oozing out one end while tying off the other but you can get the hang of it pretty easily. Try to make sure you don’t get any air pockets, even at the cost of tying off a bit further into the sausage and wasting a little bit of filling.
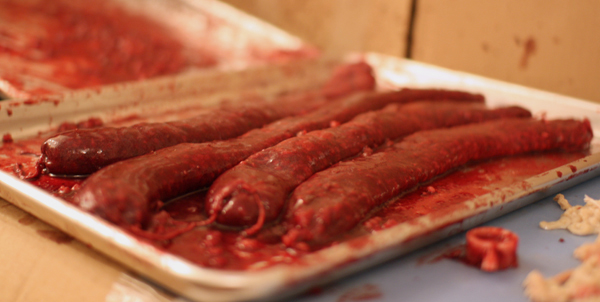
It’s very important not to stuff the sausages too much or else they will burst while cooking. In the following picture you’ll see how they flatten out a bit and look a bit deflated. That’s what you should shoot for. We made maybe 5 or 6 at a time and let them sit like this for a few minutes before boiling them. This allowed the blood to even out throughout the sausage, which led to a more consistent product.
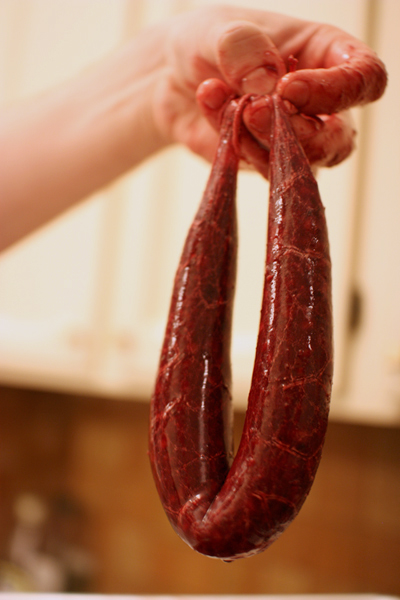
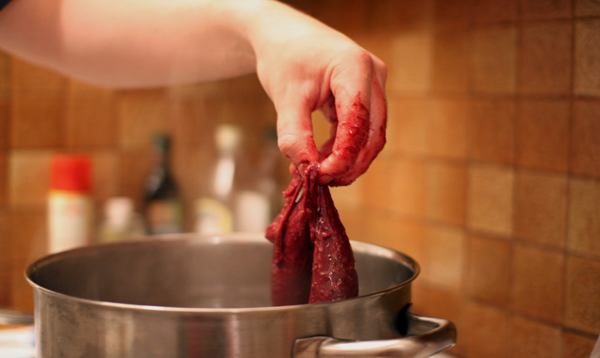
Boiling is easy. Gather up the ends (note the relative fullness of the sausage)
And lower it gently into simmering water. Simmering, not rolling boil.
You can cook several at once if you have a large enough pot. Cook each sausage for 15 minutes this way. If they wind up floating after a minute or two, take a knife and just barely puncture the skin of the sausage where it rises out of the water. This should allow any trapped air to escape and the sausage should sink.
After 15 minutes, remove the sausages and put them on a drying rack. They’ll look amazing at this point - all round and smooth like a really fancy hotdog.
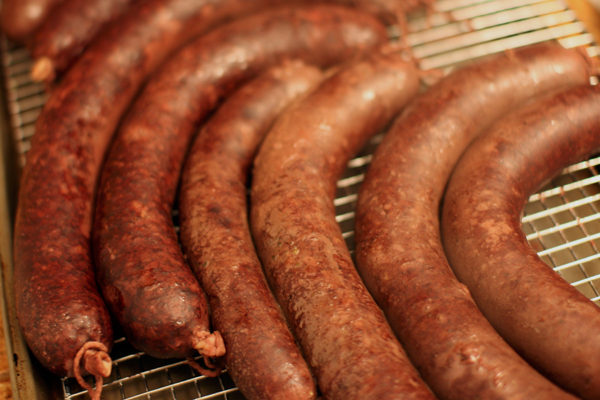
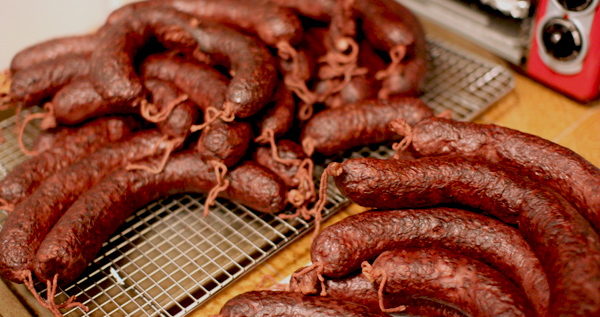
Over time they’ll dry out and darken in color. Once they’ve cooled enough to handle, you can put them in the fridge if you’re planning on eating them in a couple of days, or freeze them for months. They keep rather well.
Serving
The ideal state for a served verivorst is crispy outside, moist and chewy inside. This typically means baking at a very hot temperature, covering the sausage with bacon to lubricate the skin and prevent it from burning.
If your sausages are frozen, defrost them in the fridge a day or two in advance.
Peel and quarter some potatoes and then parboil them for maybe 10 minutes. Drain the potatoes and toss with olive oil, rosemary, salt and pepper.
Pour some oil into a baking pan, arrange the potatoes in a layer, and then nestle the thawed verivorst amongst the potatoes. I get the thickest cut bacon I can find (if your butcher will slice to order, get 1⁄4”) and drape slices on top of the sausages.
Bake them at 400 degrees for about 40 minutes or until the sausages are crispy. It’s OK to let them go longer as long as they don’t dry out or burn, so if the potatoes aren’t done yet keep them in the oven. The potatoes should be golden and have dark or even slightly charred edges. They’ll wind up having a crunchy crust and a fluffy center and are ridiculously good with the verivorst.
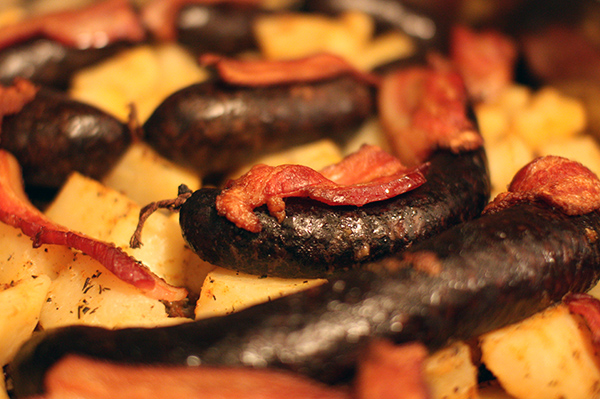
Serve the sausages with the potatoes, sauerkraut and cranberry sauce. The sauerkraut gives a bit of acid which cuts the richness of the verivorst, and the cranberry makes a sweet, cool contrast with the rest of the hearty foods.
Head isu!
Comments? If you have feedback, please share it with me on Twitter!